Hardwood floor sanding is among the most transformative DIY or professional jobs you can tackle in a British home. Strip away years of scuffs, varnish yellowing or builder’s paint splatters and you uncover that gorgeous, honey-toned timber you paid for in the first place. Yet successful sanding is far more than hiring a drum machine on a Friday afternoon and hoping for the best—it demands method, patience and the right finish for our famously damp UK climate.
Below you’ll find a numbered, rank-ordered blueprint drawn from the 27-plus-year expertise of London’s family-run specialists Sanding Wood Floors. Where relevant, we link directly to their service pages so you can dive deeper—or book the professionals when the job feels too big.

1. Book Your Timber “MOT” (Moisture & Observation Test)
Why it matters
- Moisture above 12 % can trap water vapour beneath the finish and cause whitening or blistering later.
- Hidden nail pops split sanding belts in seconds.
How to do it
- Hire or borrow a pin-type meter (Amazon ~£20).
- Take at least five readings per room, including near radiators and external walls.
- Log any boards that flex or squeak.
Shortcut for busy Londoners: the Hardwood Floor Sanding team includes a full diagnostic survey in every quotation, saving you the cost of separate hire (sanding-wood-floors.co.uk).
2. Empty the Space & Seal It Like a Crime Scene
London terraced houses are notorious for chimney soot hiding behind skirting boards; you don’t want it airborne.
- Remove doors at the hinge pins.
- Mask sockets with low-tack tape.
- Staple-gun 120 μm plastic across wardrobe openings.
- Hang a damp sheet over the doorway to act as a secondary “dust curtain”.
Need near-zero dust? Their Wood Floor Sand & Seal package pairs dust-containment vacuums with an immediate first coat of sealer, cutting airborne particles by up to 95 % (sanding-wood-floors.co.uk).

3. Tighten, Repair & Gap-Fill Before You Touch Abrasive
Open joints between Edwardian pine boards or loose parquet fingers telegraph straight through the final coat.
DIY recipe
- Mix the first bag of 80-grit dust with a quality resin filler to create colour-matched putty for hairline cracks.
- Cut Dutchman patches (butterfly-shaped inserts) for knots wider than two 50 pence coins.
Not confident with chisels? Book the Floor Restoration & Gap Filling crew— they splice reclaimed boards and colour-sync repairs in a single visit (sanding-wood-floors.co.uk).

4. Select Your Grit Sequence—The Real Art of Sanding
Think of sanding like sharpening a knife: you must step through coarser to finer abrasives. Skip a grade and you’ll chase scratches for the rest of the weekend. A typical UK sequence: 36 → 60 → 80 → 120 grit.
- Start with 24-grit only if the floor is painted or deeply cupped.
- For parquet, open with 40-grit at 45° to the grain.
- Always finish along the grain to remove swirl marks.
5. The First Cut (Drum/Belt Pass)
Keep the machine moving the moment the drum contacts the timber—pause for three seconds and you’ve carved the Grand Canyon.
Pro tip: align the machine’s front wheel 2 cm from the skirting. Your edge sander will cover that final strip perfectly.

6. Edge & Corner Sanding—the “London Knees” Test
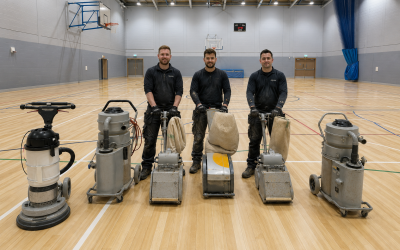
No drum sands flush to a wall. Swap to an edge sander with 40- then 80-grit disks. Corners, under radiators and around balustrades need a triangular “delta” sander or old-school hand scraping.
- Wear padded knee braces—Victorian pine splinters hurt.
- Use a head-torch; London basement flats rarely have perfect daylight.

7. Medium & Fine Cuts—Erase Your Own Mistakes
Each successive pass should remove only the scratches made by the previous grit. Vacuum thoroughly between passes and wipe with methylated spirits on a microfibre cloth; it lifts fine dust and flashes off quickly in our cool climate.
8. Colouring Decisions—Scandi White, Heritage Oak, or Clear?
Water-based stains suit modern apartments (low odour, fast drying). Oil-based stains add that classic, amber glow to period floors. Always “water-pop” (lightly mist the timber) before staining for even absorption.
If you’d rather leave colour to the experts, explore their Varnish Treatment options— bespoke blends from dead-matt to high-gloss, tailored for London humidity (sanding-wood-floors.co.uk).
9. Seal & Cure—Where Many DIY Jobs Fail
Three coats are obligatory for London traffic levels:
| Coat | Product Type | Dry-Time* | De-Nib Grit |
|---|---|---|---|
| 1st | Primer/Sealer | 1–2 hrs | None |
| 2nd | Water-based Poly | 3 hrs | 220 |
| 3rd | Water-based Poly | 24 hrs (light use) | 320 |
*At 18 °C / 60 % RH. Add extra curing time during February freezes or July heatwaves.
- Maintain positive airflow but avoid direct fan blast that ripples the film.
- Walk in clean socks only for the first 24 hrs.
For overnight commercial turnarounds, the Commercial Wood Floor Care Services team uses rapid-cure lacquers so offices reopen by 8 am Monday (sanding-wood-floors.co.uk).

10. The 48-Hour Rule—When to Move Furniture Back
Even “quick-dry” finishes need full chemical cure. Dragging a sofa across semi-cured polyurethane will weld felt pads to the floor.
- Day 3: restore lightweight items.
- Day 7: rugs, pianos, and those cast-iron radiators found in many London semis.
11. Ongoing Maintenance—Protect Your Investment
Daily
- Dry microfibre sweep to remove grit.
Weekly
- Mop with a pH-neutral wood-floor cleaner (avoid steam mops).
Annually
- Apply a fresh maintenance coat: the Wood Floor Maintenance & Care package means zero sanding dust and half-day downtime (sanding-wood-floors.co.uk).

12. Advanced Upgrades (Optional, but Worth It)
- Soundproofing beneath first-floor flats to satisfy London leasehold requirements.
- UV-cured lacquers that reach full hardness instantly—ideal for restaurants.
- Hybrid Oil/Hardwax systems for heritage properties needing deep lustre.
Sanding Wood Floors can combine any of the above within their Floor Finishes & Seals menu for a truly bespoke result (sanding-wood-floors.co.uk).
Frequently Asked Questions
How long does a typical 25 m² London living room take to sand?
Plan on one long weekend for careful DIY, or 8–10 working hours for a two-person professional crew. Factors include board repairs, stain choice and drying weather. (sanding-wood-floors.co.uk)
What if the old boards are too thin?
A professional will check remaining wear-layer depth with a caliper gauge. If you have less than 2 mm of sandable timber, consider a screen-and-recoat instead of full sanding.
Can engineered floors be sanded?
Yes—once or twice—provided the wear layer is ≥ 3 mm. The Sanding Wood Floors blog details the full process. (sanding-wood-floors.co.uk)
Will sanding increase my home’s value?
UK estate agents regularly quote 3–5 % uplift on properties with freshly restored hardwood floors. (sanding-wood-floors.co.uk)
Common Mistakes & How to Avoid Them (Save Yourself £££)
- Skipping grits – leaves tramlines that only 36-grit can erase.
- Lingering with the drum lowered – scorches board ends.
- Under-vacuuming before lacquer – traps “black pepper” specks in the film.
- Finishing after 6 p.m. – rising night-time humidity can bloom water-based lacquers.
- Returning furniture too soon – flattening soft finishes into “ghost” marks.
Essential Toolkit Checklist
- Drum/belt sander with spare 24, 36, 60, 80, 120-grit belts
- Edge sander & 40/80-grit discs
- Detail (corner) sander
- Industrial vacuum with HEPA filter
- Dust masks to FFP2 standard
- Moisture meter, claw hammer, nail punch
- Knee pads, ear defenders, safety glasses
Hiring in London? Expect ~£180 for a weekend bundle; add £35 for delivery inside the Congestion Zone.
Time-and-Money Calculator
| Task | DIY Hours | Pro Crew Hours | Typical DIY Cost* | Pro Service Estimate* |
|---|---|---|---|---|
| Survey & prep | 4 | 1 | £40 | Included |
| Repairs & gap fill | 6 | 2 | £75 | £250 |
| Sanding passes | 10 | 4 | £210 (machine + abrasives) | £650 |
| Stain & seal | 6 | 3 | £90 | £280 |
| TOTAL | 26 | 10 | ~£415 | ~£1,180 |
*London prices, July 2025.
When you factor lost weekends, delivery logistics and parking suspensions, many homeowners decide professional help is the cheaper route in the end.
Ready to See the Grain Again?
Whether you’re the adventurous DIY-er with dust mask in hand or the time-poor city dweller keen to outsource, hardwood floor sanding repays effort a hundredfold. Follow the twelve steps above for a flawless, durable finish—or let the experts handle it while you enjoy your weekend.

Call 0800 955 0015 for a free, no-obligation survey anywhere within the M25
Quote “Guide2025” for a complimentary upgrade to quick-dry primer on bookings confirmed this month.
Prefer to book online? Visit the contact page or explore individual services:
- Hardwood Floor Sanding – flagship service for Victorian planks and modern oak alike.
- Wood Floor Sand & Seal – dust-contained and pre-sealed for pets and allergy sufferers.
- Floor Restoration & Gap Filling – perfect for draughty boards.
- Varnish Treatment – tailor the sheen from dead matt to piano gloss.
- Commercial Wood Floor Care Services – evening and weekend schedules.
- Floor Finishes & Seals – oils, hardwax and UV-cured options.
- Wood Floor Maintenance & Care – annual top-up coats without sanding.
Bring your floors back to life—one perfectly prepared, professionally finished board at a time.